Bunkycooks has moved to a new site!
Please come and visit me at Bunkycooks.com
Thank you for your visit and I look forward to seeing you there!
Bunkycooks has moved to a new site!
Please come and visit me at Bunkycooks.com
Thank you for your visit and I look forward to seeing you there!
Filed under Uncategorized
Hi there!
I think I have almost settled in to my new site! I have been spending the last few days trying to learn all sorts of new and frustrating exciting features that come with a hosted site!
By the way, this is the banner that you will now see at the top of the Bunkycooks site! I think Barb (my web designer) did a great job! Yeah, Barb! I was just so excited that I had to show it to you! 🙂
Anyway, if you know me personally, you will know that I love to cook and entertain, but I am no computer guru, so this has been, shall we say…interesting!
Well, after much screaming and throwing things google searching, annoying my site designer and just plain old trying and trying and finally figuring it out…I think I am ready to transfer everything over!
One awesome feature at my new site is a printable recipe! I love that option and I hope you will, too! There are all sorts of fancy things I can do now once I figure out how to do them! 😉
So, here is the new site http://bunkycooks.com/ Please check it out!
NOTE – If you have been a subscriber to Bunkycooks either by email or RSS feed, you will need to subscribe again. I am sorry for the inconvenience, but those things did not transfer with me. I would appreciate it if you could please take a few minutes once you go to the new site and subscribe by doing the following:
Please click on this RSS button on the right hand side of the blog beneath the banner on my site. It looks just like this orange button!
The Feedburner subscription menu will pop up. You then need to select how you would like to receive Bunkycooks. You can choose a reader or email updates.
For those of you that choose to receive email updates, you will be sent an email from Feedburner after you submit your email address on the form. They will then send you a link to activate your subscription. Just click on the link and you will then be subscribed to the new Bunycooks site!
Thank you all so much for stopping by and following my blog. I look forward to lots more cooking and fun (you’ve gotta have fun!) at the new site!
Filed under Bunkycooks new site
I might ramble a bit today (what else is new?) because there are several reasons for writing today’s post. One being that I think this post is very appropriate for Easter since I made coconut cupcakes (I just think of Easter when I think of coconut cake…don’t ask me why!). It is also a fun post because my hubby has gone totally creative insane (just take a peek at the peeps in the pictures!). 😉 We have now resorted to playing with our food!
This is a sentimental post for me since the first picture I had on my banner for this blog was of these very same coconut cupcakes! Some of you may remember that photo (it was not a very good one – it had white balance issues). It certainly would have been rejected by my friends at the foodie photo websites! Back then (in November), I did not even know of those sites, so it would not have been a concern! Maybe I was better off not knowing about those sites! Now they just stress me out! Anyway, you food bloggers will know what I am talking about! 😉
Back to the cupcakes…these cupcakes were a huge hit with family and friends when I first made them. Such a big hit, in fact, that I had some people (and you know who you are!) driving over to my house to pick them up on a moment’s notice. They truly are that good! In fact, I will be calling those people today once all these photos are taken because we do not need to be eating these. You will know why when you click on the link to the recipe below!
The other reason for just having some fun today (and being sentimental) is because I am saying goodbye to WordPress.com and moving to a hosted site within the next few days. 😦 That may not mean a whole lot to many of my readers, but when you return after the move, you will see a very different Bunkycooks.
I am excited and scared to death anxious about the new site because it involves way more computer skills than I have, so if things are a bit whacky for a while, please bear with me! To my subscribers (thank you, by the way!), you will probably need to subscribe again to the new site because I am not sure that the subscriptions will transfer over. 
Now, once again…about the cupcakes…they are incredibly fattening delicious, so if you are looking for a really yummy coconut cake recipe, it does not get much better than this one!  You can click HERE for the link to Ina Garten’s recipe. Now you should have known it might be her recipe if they are that decadent!!!
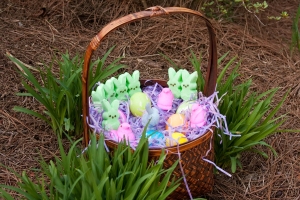
I hope you enjoy the pictures today. We are now TOTALLY certifiable! Keep checking back over the next few days to see the vastly improved Bunkycooks with a printable recipe and all! (Yeah! And the crowd went wild!)
I have had fun with my peeps and I hope you do the same this holiday weekend! This post gives a whole new meaning to the term “peep show”!
Let’s get together soon! Have your peeps call my peeps and we will set up a date! 😉
OLYMPIC ARCROBATIC PEEP TEAM!
Filed under Coconut Cupcakes, Desserts, Easter, Fun Stuff, Peeps
PLEASE BE SURE TO CHECK OUT MY NEW SITE AT WWW.BUNKYCOOKS.COM. YOU WILL FIND THIS RECIPE AND LOTS MORE THERE!
I know that there is no way to have a post today that is anywhere near as pretty or as exciting as Saturday’s Orange Tian from The Daring Baker’s Challenge, so I will not even try!
I will, however, make many friends and neighbors (and hopefully others!) happy by posting an incredibly delicious recipe for something simple and healthy that can be whipped up in almost no time for dinner!
I will tell you (and you certainly may already know this)…I am not a turkey burger girl! Where’s the beef? That’s what I want to know! I think ground turkey is a total bore (even in chili). I have tried and tried to make it tasty, but I am always less than impressed. My take on food is, if it’s not worth the calories, then I am not eating it! That is generally how I feel about the gobbler burger!
I decided to take a peek on line (because I know there are so many wonderful cooks out there that post recipes), to see if I had missed something. I did find a recipe from The Neelys (Food Network) that uses Pepper Jack Cheese in the middle of the turkey burgers. Maybe now we were talking!
I know that they used some onion and garlic in the ground turkey, so I did that. Then I added some of our leftover Country Bob’s Regular All Purpose Sauce. I knew I wanted to try it in ground meat and I will tell you…it was the absolute best turkey burger I have ever had. It was moist and delicious. I must admit, that sauce is really yummy and I am so excited that I was sent a few bottles to test it out!
If you do not have or cannot find the sauce, you should try a barbecue sauce that you like (with some hot and sweet) or A-1 sauce and add some heat (maybe a pinch of red pepper flakes). The incredible flavors were achieved with the addition of that one ingredient. It also created the moistness in the burger. Be sure to cook these burgers inside and not on the grill. They will stay together better if they are sautéed in a pan. They will also be juicier. (I highlighted this because I have had some readers ask about cooking the burgers on an outdoor grill. I advise that you cook them inside in a pan. They will not be moist and sometimes fall apart when cooked outdoors. They are sooo much better when browned in a little olive oil!).)
In addition to the burger, I oven roasted some sweet potato fries. Oh, my gosh! I sprinkled them with Za’atar, which is Middle Eastern spice that is normally used to top pita bread (or it can be used in various dishes). Forget the pita and top these fries! This was such an incredible, simple dinner! It was low-fat and healthy. I even used 80 calorie whole wheat buns from Sara Lee. Shocking, I know!
Turkey Burgers
Makes 3
20 oz. ground turkey (white and dark meat)
1/2 medium onion, diced
1 clove garlic, minced
Sea salt and freshly ground black pepper, to taste (a bit more than a pinch!)
1/4 cup Country Bob’s Regular All Purpose Sauce (substitute your favorite barbecue sauce or A-1)
Slices of Pepper Jack Cheese
Additional sauce, warmed to top cooked burger
Olive oil
Mix first 5 ingredients together in a large bowl. Shape ground turkey into 6 thin patties. Fold cheese slices into small squares (I used 1/2 slice per burger) or cut slices from a block of cheese. Place in the middle of the burgers. Top with another patty. Be sure there is enough room all around the sides to seal the burger well (you do not want all the tasty cheese oozing out while it cooks!). Repeat this 2 more times to make 3 burgers.
Heat a small amount of olive oil in a large nonstick pan over medium heat (preferably a griddle pan, if you have one). Brown burgers on one side (about 5 minutes). Flip the burgers and brown on the other side (another 4-5 minutes). Check to be sure the turkey is cooked.
Place cooked burgers on a bun and top with warm Country Bob’s Sauce (or substitute), lettuce and any other burger condiment you like. That’s it! It is soooo good!
Sweet Potato Fries
Serves 2-3
2 large sweet potatoes
2 Tablespoons olive oil
Kosher salt and freshly ground pepper
Za’atar seasoning
Preheat oven to 425 degree. Wash and scrub sweet potatoes. Cut into large slices (do not make them too thin or they will burn). They should be the size of homestyle potatoes. Toss them with the olive oil and salt and pepper to taste. Place on a nonstick baking sheet.
Cook them in the oven for 15 minutes and then flip over. They should be crispy and brown in about another 10-15 minutes. Remove from the sheet and sprinkle generously with Za’atar seasoning.
This is the perfect quick and easy dinner that still has tons of awesome flavors! I have finally found something to make me want to eat turkey in a burger and not just have sliced turkey breast meat for Thanksgiving! 🙂
Filed under Cheese, Country Bob's, Entrees, Healthy, Low-fat, Recipes, Sweet Potato Fries, Turkey Burgers, Za'atar
BUNKYCOOKS HAS MOVED TO A NEW SITE! PLEASE CLICK HERE TO BE TRANSFERRED TO THE NEW SITE. THANK YOU!
The challenge for March was hosted by Jennifer from Chocolate Shavings. This recipe is based on the one she prepared at the Alain Ducasse Cooking School in Paris, France. As Jennifer said, this is a “scrumptious” dessert and it truly is!
With this being my first Daring Baker’s Challenge, I must admit that when I checked in at the end of February to get my “orders” for the challenge, I rather felt like Jim Phelps (played by Peter Graves) from the original Mission Impossible! If you are much younger (and you just might be!), you probably can relate to Tom Cruise in the updated version of the movie. The Daring Bakers Challenge is supposed to be a secret until the “reveal” a month later. In other words, I did not utter a word to anyone about this dessert and kept it totally under wraps (at least to anyone that would know or care!) until now. Shhhhh……
I was excited about my first challenge, but not so sure about a dessert with oranges. I love citrus desserts made with lemons (especially Meyer lemons!), but this, well…oranges are just not my favorite fruit. I still remember way too many doses of orange penicillin when I was a kid, so I always relate anything that includes orange to that nasty stuff. Anyway, I was willing to give it a try! There’s always Mikey if I don’t eat it!
There were quite a few steps and this was done over a two-day period, but the results were phenomenal. The Tian was just divine (oranges and all!). I have thoroughly enjoyed having the leftover homemade orange marmalade as well. It was fabulous and nothing like the goop that you purchase in the store. Just forget about that junk and make this recipe for orange marmalade! That recipe alone was worth participating in this month’s challenge.
I offered to bring dessert to a neighbor’s dinner party the day these were prepared, so the guests were oh so fortunate to be able to enjoy this lovely treat. The only thing I wish I had done differently was to add a layer of dark chocolate to a few of the molds (on the pastry circles) to see how that might have tasted! I will have to try that next time!
Orange Tian
For the Pate Sablee:
Ingredients U.S. Imperial Metric Instructions for Ingredients
2 medium-sized egg yolks at room temperature
granulated sugar 6 tablespoons + 1 teaspoon; 2.8 oz; 80 grams
vanilla extract ½ teaspoon
Unsalted butter ¼ cup + 3 tablespoons; 3.5 oz; 100 grams ice cold, cubed
Salt 1/3 teaspoon; 2 grams
All-purpose flour 1.5 cup + 2 tablespoons; 7 oz; 200 grams
baking powder 1 teaspoon ; 4 grams
Directions:
Put the flour, baking powder, ice cold cubed butter and salt in a food processor fitted with a steel blade.
In a separate bowl, add the eggs yolks, vanilla extract and sugar and beat with a whisk until the mixture is pale. Pour the egg mixture in the food processor.
Process until the dough just comes together. If you find that the dough is still a little too crumbly to come together, add a couple drops of water and process again to form a homogenous ball of dough. Form into a disc, cover with plastic wrap and leave to rest in the fridge for 30 minutes.
Preheat your oven to 350 degree Fahrenheit.
Roll out the dough onto a lightly floured surface until you obtain a ¼ inch thick circle.
Using your cookie cutter, cut out circles of dough and place on a parchment (or silicone) lined baking sheet. Bake for 20 minutes or until the circles of dough are just golden.
For the Marmalade:
Ingredients U.S. Imperial Metric Instructions for Ingredients
Freshly pressed orange juice ¼ cup + 3 tablespoons; 3.5 oz; 100 grams
1 large orange used to make orange slices
cold water to cook the orange slices
pectin 5 grams
granulated sugar: use the same weight as the weight of orange slices once they are cooked
Finely slice the orange.

Place the orange slices in a medium-sized pot filled with cold water. Simmer for about 10 minutes, discard the water, re-fill with cold water and blanch the oranges for another 10 minutes.
Blanch the orange slices 3 times. This process removes the bitterness from the orange peel, so it is essential to use a new batch of cold water every time when you blanch the slices.
Once blanched 3 times, drain the slices and let them cool.
Once they are cool enough to handle, finely mince them (using a knife or a food processor).
Weigh the slices and use the same amount of granulated sugar . If you don’t have a scale, you can place the slices in a cup measurer and use the same amount of sugar.
In a pot over medium heat, add the minced orange slices, the sugar you just weighed, the orange juice and the pectin. Cook until the mixture reaches a jam consistency (10-15 minutes).

Transfer to a bowl, cover with plastic wrap and put in the fridge.
For the Orange Segments:
For this step you will need 8 oranges.
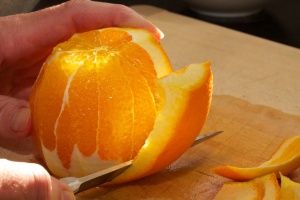
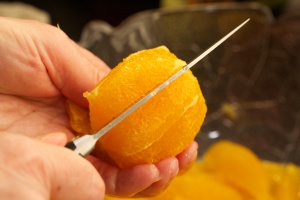
Cut the oranges into segments over a shallow bowl and make sure to keep the juice. Add the segments to the bowl with the juice.
For the Caramel:
Ingredients U.S. Metric Imperial Instructions for Ingredients
granulated sugar 1 cup; 7 oz; 200 grams
orange juice 1.5 cups + 2 tablespoons; 14 oz; 400 grams
Place the sugar in a pan on medium heat and begin heating it.
Once the sugar starts to bubble and foam, slowly add the orange juice. As soon as the mixture starts boiling, remove from the heat and pour half of the mixture over the orange segments.
Reserve the other half of the caramel mixture in a small bowl — you will use this later to spoon over the finished dessert. When the dessert is assembled and setting in the freezer, heat the kept caramel sauce in a small saucepan over low heat until it thickens and just coats the back of a spoon (about 10 minutes). You can then spoon it over the orange tians.
[Tip: Be very careful when making the caramel — if you have never made caramel before, I would suggest making this step while you don’t have to worry about anything else. Bubbling sugar is extremely, extremely hot, so make sure you have a bowl of ice cold water in the kitchen in case anyone gets burnt!]
For the Whipped Cream:
Ingredients U.S. Metric Imperial Instructions for Ingredients
heavy whipping cream 1 cup; 7 oz; 200 grams
3 tablespoons of hot water
1 tsp Gelatine
1 tablespoon of confectioner’s sugar
orange marmalade (see recipe above) 1 tablespoon
In a small bowl, add the gelatine and hot water, stirring well until the gelatine dissolves. Let the gelatine cool to room temperature while you make the whipped cream. Combine the cream in a chilled mixing bowl. Whip the cream using a hand mixer on low speed until the cream starts to thicken for about one minute. Add the confectioner sugar. Increase the speed to medium-high. Whip the cream until the beaters leave visible (but not lasting) trails in the cream, then add the cooled gelatine slowly while beating continuously. Continue whipping until the cream is light and fluffy and forms soft peaks. Transfer the whipped cream to a bowl and fold in the orange marmalade.
[Tip: Use an ice cold bowl to make the whipped cream in. You can do this by putting your mixing bowl, cream and beater in the fridge for 20 minutes prior to whipping the cream.]
Assembling the Dessert:
Make sure you have some room in your freezer. Ideally, you should be able to fit a small baking sheet or tray of desserts to set in the freezer.
Line a small tray or baking sheet with parchment paper or a silicone sheet. Lay out 6 cookie cutters onto the parchment paper/silicone.
Drain the orange segments on a kitchen towel.
Have the marmalade, whipped cream and baked circles of dough ready to use.
Arrange the orange segments at the bottom of each cookie cutter. Make sure the segments all touch either and that there are no gaps. Make sure they fit snuggly and look pretty as they will end up being the top of the dessert. Arrange them as you would sliced apples when making an apple tart.
Once you have neatly arranged one layer of orange segments at the bottom of each cookie cutter, add a couple spoonfuls of whipped cream and gently spread it so that it fills the cookie cutter in an even layer. Leave about 1/4 inch at the top so there is room for dough circle.
Using a butter knife or small spoon, spread a small even layer of orange marmalade on each circle of dough.
Carefully place a circle of dough over each ring (the side of dough covered in marmalade should be the side touching the whipping cream). Gently press on the circle of dough to make sure the dessert is compact.

Place the desserts to set in the freezer to set for 10 minutes.
Using a small knife, gently go around the edges of the cookie cutter to make sure the dessert will be easy to unmold. Gently place your serving plate on top of a dessert (on top of the circle of dough) and turn the plate over. Gently remove the cookie cutter. Add a spoonful of caramel sauce and serve immediately.
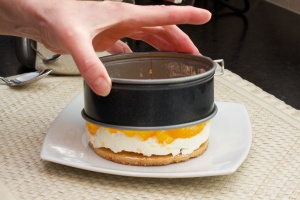
Add a spoonful of caramel sauce and serve immediately.
Filed under Caramel Sauce, Daring Bakers Challenge, Desserts, French, Orange Tian, Oranges, Recipes

I received an email a few days ago about a contest to win a private room at Camp Blogaway (which incidentally is coming up very quickly!). Well, I let it sit for a few days trying to decide if I should do a post or not since I have been busy and pressed for time to get anything done (especially housework). If you are not familiar with Camp Blogaway, this is a camp for food bloggers in Southern California in mid-May to get to know each other and learn some really great blogging and photography tips from the professionals (at least I think that is what I will be doing at 7000 feet in the woods!) 😉
While trying to decide whether or not I should take time out of my crazy life to write this post, I was flooded with memories (what few I have and those I did not block out permanently) of my camper days! They were truly not the best of times, so I then was asking myself…why am I going camping in May????? Based on those less than pleasant memories, I decided that heck yeah, I better write this post! If I am going to be sleeping in the woods with strangers, I sure as heck want a private room (with a lock!)!
Now, if you know me personally, you know I am not a camping type of gal. My philosophy has always been “Why would you sleep in the woods when there is a perfectly good hotel right down the mountain?” I like a nice warm bed with soft linens, a hot shower and my blow dryer! So, you can imagine how I was feeling when I got my camper packet in the mail and discovered I have to bring my own bedding, towels and soap to Camp Blogaway! Yikes!
Now, that would not have been so bad if I could jump in the car and drive up or down the coast of CA, but I am flying across the country and I have to pay to haul this stuff in an extra suitcase. That’s $25 extra (thank you Delta Airlines!). Okay, I guess I can get over that, but then I started thinking…if I am bringing my linens, just what kind of mattresses are on these beds??? Do we even have mattresses???!!!
I have a number of middle-aged ailments (herniated disk, sciatica, hip replacement – are you feeling sorry for me yet??), so I am now dreading the sleeping arrangements and fearing for mobility issues after 2 evenings on a cot (presumably?). In addition to the imminent stiffness issue, Patti (our fearless camping leader), also said not to worry about bringing make-up or hair dryers. So, now will I not only feel bad, I will look bad too!
With this in mind, I will now BEG for that private room! 🙂
I know that I am a big girl now and can certainly hit a hotel if I totally can’t take the camping. However, eons ago, when I was just a little girl and shipped off to camp for a week, I remember being totally miserable. Since this was in the olden days, there were no cells phones to call home and ask what you possibly could have done to be shipped off like this. You were not able to call and plead with your parents to promptly be picked up and brought home!
My next memory of camping was a class trip in 5th grade to Gettysburg, PA. I don’t think the grub (camper speak for food) was too terrible. I remember we had to hike up a hill to get to the mess hall (that’s where campers eat). So, I guess either the food was okay or we were starved to death and ate it anyway. I also painfully remember the cabins had those gosh forsaken cots and it was chilly and musty. However,that was not the worst of it. It was nasty bathrooms that we had to share with members of the opposite sex (at age 10)!
Since we were in the woods, these bathrooms were not plush to begin with. In addition, since they were co-ed loos, they were less than, would you say, sanitary?! Of course, the big thing for boys of that age to do was to sneak up on the girls while in the bathroom either showering or doing other unmentionable things. Well, let me tell you, that just was not fun and the boys were really creepy, so that would be my memories of that little camper adventure.
My final (and thankfully) last attempt at this, was on the Skyline Drive while I was in college. I went up to a campsite with a friend from school with my little Fiat car (if you remember those, you might just be my age!;) ). The wind was whipping so strong that it blew out all the power in the lodge on the mountain (for 2 days, I might add). So, silly us, decided to just put that pup tent right up anyway and get to camping! Now if you know anything about camping (and we didn’t, I might add), you would know that teeny little tent wasn’t going to work so well with those fierce winds!
After setting up “camp” (yeah, right) and being the novice campers that we were, when we could not get a fire going outside the tent to cook our dinner (due to major winds and fires extinguishing immediately upon being lit), we decided to heat that food right up inside the tent! Now, you might guess what would happen in that case (no…I did not burn the tent down). Instead, we had the local residents coming to visit all night long! Yes, indeedy! We had to put all the canteens and backpacks, etc. all around the inside of the tent that night so we could hear if Smokey the Bear or Rocky Raccoon were stopping by for a snack. And then the tent would suck in and blow out all night long with the high winds. Can you imagine having so much fun??
To top it off, the next day as we were getting in the car to go for a drive around the park, the winds whipped up and blew my passenger side car door completely in the opposite direction of where it should go and put a crease right in the door! Nnuf said. The 2 day camping adventure was over in one day!
So, after reliving these not so pleasant camping memories, I decided that YES I do need, want and have to have a private room if I am going to step foot anywhere near a campsite!
Most importantly, we have been warned to be careful about stashing food in our cabins due to mice and other critters. I am really happy to get to know everyone at Camp Blogaway, but because I do not know any of you yet, I am just not sure if I can trust you other gals to leave your snacks at home or locked up in steel drums and I am not interested in my suitcases ending up like this! Click here!!
So, I beg of you to pretty please, please pick me! Pick me! (I know I used that earlier in my blog, but I just had to do it!) 🙂
Filed under Camp Blogaway, Food Blogging
I was fortunate enough to find fresh English Peas at Harry’s Farmers Market over the weekend. They are not something we get to see very often in the big city, so naturally, I got them while I could! This truly was a sign that Spring might be just around the corner!
I often cook with lots of ingredients and make a huge mess in my kitchen, but for this particular post, simpler is better. The peas are just wonderful fresh out of the pods with not much fuss.
Now, I wanted to be clever (or try to be anyway) and call this post Peas and Their Pods, but there is a blog by the name of Two Peas and Their Pod (which is very cute, by the way), so I decided it was best to avoid that title and proceed with something not nearly as catchy!
The pictures speak for themselves. The peas were beautiful. It was fun to pop them out of their shells. It reminded me and my hubby of many years ago when we were kids (yes, unfortunately, it was many years ago!). Shelling peas was something we did all the time because this is how most of us ate peas. No cans, no bags of frozen peas…
I found a recipe for fresh peas with red onion and mint and it sounded delightful, but I decided to not muck them up with a bunch of other flavors. I was not sure if I would find them again this Spring, so I prepared them as simply as possible.
English Peas
Enough peas for two servings
Salt and freshly ground black pepper
Pats of salted butter
Bring a pot of salted water to a boil. Add your fresh peas and boil for 4-5 minutes. Drain and serve with salt and pepper, to taste. Top with pats of butter.
That’s it! No fuss. They were truly delicious!
It doesn’t get any better than this!
Filed under English Peas, Spring, Vegetables
I have been thinking a lot lately about the trip we took to France and Spain last October. We had never been to Spain before, but we absolutely feel in love with the places we saw! Barcelona was my favorite spot, but Valencia is where I had what I would consider to be authentic paella.
Now, I know there are probably as many versions of paella as Imelda Marcos has shoes. Paella can be prepared many ways and it depends on where you are as to what you are going to get! I saw paella cooked with rice and with pasta (think spaghetti). With pasta it is called fideua. That is traditionally served in Barcelona. Both versions (rice and pasta) can be prepared with pork, chicken and sausage as well as all types of fish and seafood. Some dishes combine a little of each.
I do have to say that they know to serve the stuff up right in Barcelona! We saw the beginnings of a major paella party cranking up outside the Cathedral Sagrada Familia when we were visiting. Here is a picture of what happens when they get to whipping up a big ole batch of the stuff!
I personally prefer the chicken and shrimp version with rice (Valencian paella). I opt out of the whole other seafood thing because you are never really sure what you are going to get (especially when you do not understand much Spanish). I saw some really creepy looking fish in those markets in Spain and the last thing I wanted was some of that stuff in my paella. They call certain seafood “monsters” for a reason! 😉
I have a recipe for paella that I loved to cook before I went to Spain. It was as good as anything I had here in the states and frankly, it was pretty easy and quick. Well, of course, that trip ruined things for me, so now, I prefer the really long version and it is sooooo worth it! That recipe I was using just does not have the depth of flavors that this more authentic version has. This new recipe tastes about as close as I can get to what I had in Valencia. I have made it a few times and it always turn out perfect.
The paella I had in Valencia had chicken and shrimp and some chorizo. This recipe I have found has the same ingredients. My hubby would rather have more seafood than what I care for and since I will not allow “monsters” in my food or anything resembling them, I throw a few Cherrystone Clams in for his benefit!
Not only is this paella authentic…we ate at traditional Spanish dining hours Saturday night! I was languishing on our back deck, enjoying the warm temperatures and a glass of wine with my hubby when I suddenly realized I needed to marinate the chicken and shrimp. Yikes! Dinner at 10 pm. When you plan to make this dish, be sure to plan ahead!
This recipe is adapted from Things Cooks Love by Marie Simmons (the book is available at Sur La Table – my hangout in the ATL)
Chicken, Shrimp, and Chorizo Paella
Serves 6-8
8 bone-in chicken thighs, or 1 large chicken cut into 10 pieces (cut the breast in half, so everything cooks evenly)
Coarse salt and freshly ground pepper
18 large shrimp, peeled, with shells reserved, and deveined (I used 1 lb.)
10 Cherrystone clams
6 Tbsp. extra-virgin olive oil
2 cloves garlic, bruised, plus 2 tsp. minced
2 tsp. chopped fresh rosemary, plus sprigs for garnish (if you wish)
5-6 cups low-sodium chicken broth (I use Swanson’s Organic)
1/2 cup dry white wine
1 tsp. saffron threads
1/2 cup chopped red bell pepper
1/2 cup chopped yellow onion
2 (3-oz.) chorizos, casings removed and cut into 1/4 dice (Spanish chorizo if possible, which is cured, not fresh)
1 tsp. sweet paprika
1 (14 1/2 oz.) can diced tomatoes with the juices
1 1/2 cups Spanish rice (medium grain)
1 cup frozen peas, thawed
1 lg. lemon, cut into 6-8 wedges, for garnish
1. Generously sprinkle the chicken with salt and pepper. Place the chicken in a large bowl or large resealable plastic bag. Add the shrimp, 2 tablespoons of the olive oil, the bruised garlic, and the chopped rosemary. Cover the bowl, or seal the bag, and refrigerate 2 hours or up to overnight.

2. In an 2 1/2 to 3 quart saucepan, bring the chicken broth to a boil. Decrease the heat to low and cover to keep hot.
3. in a 10-inch skillet, heat 2 tablespoons of the olive oil over medium heat. When the oil is hot, add the shrimp shells and cook, stirring, for 3 minutes, or until they turn dark red. Add 1 tsp. of the minced garlic and cook for 1 minute. Add the wine, bring to a boil, and boil for 1 minute. Add the shrimp mixture to the chicken broth, bring to a simmer, re-cover, and cook for 15 minutes. Set a strainer over a clean saucepan and strain the broth. Discard the shells. Keep broth warm over low heat.
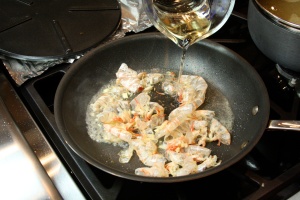
4. Crush the saffron in a mortar with a pestle, or place in a small cup and crush with the back of a spoon. Transfer to a small bowl and add a ladleful of the simmering broth. Cover and let stand until ready to use.
5. When ready to cook the paella, remove the chicken pieces from the marinade and place them on a plate. Heat the remaining 2 tablespoons of olive oil in a 12-14 inch paella pan (set over 2 burners if necessary) or an extra-large skillet over medium heat until hot enough to sizzle the chicken. Add the chicken, skin side down, and cook the other side for 5 to 8 minutes, or until browned. Return the chicken to a plate. *A splatter screen comes in handy for this sauteing!
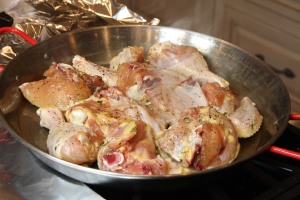
6. Add the bell pepper, onion, chorizos, and the remaining 1 teaspoon of garlic to the pan and cook over medium heat, stirring with a wooden spoon or spatula, for 5 minutes, or until the vegetables are browned.

Add the paprika and cook, stirring, for 1 minute. Add the tomatoes and cook, stirring, for 3 minutes, or until the juices boil off and the tomato is dry. Add the rice and cook, stirring for 2 minutes. Sprinkle with 1 teaspoon of salt. Bring the chicken broth to a boil and pour 4 cups of it over the rice. Add the reserved broth (with saffron) and stir into the other ingredients. Arrange the chicken pieces around the outer edges of the pan.
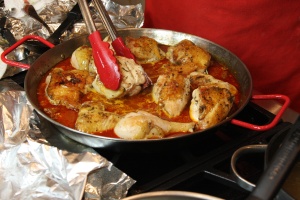
7. Cook uncovered over medium heat, without stirring, for 15 minutes, or until most of the broth has been absorbed by the rice. Taste the rice and add more salt if needed.
8. Tuck the shrimp down into the partially cooked rice, concentrating them in the center area of the pan. Ladle 1 cup of the simmering broth over the rice and cook 5 minutes more. As the rice cooks, it will continue to absorb the broth. Add more broth as needed, tasting the rice each time. It should be tender, but firm. If you run our of broth before the rice is ready, use boiling water.
9. Sprinkle the peas on top. Tuck the clams into the rice and the broth. Lay a piece of extra-wide aluminum foil over the paella for the last 5 minutes of cooking. Remove from the heat and let the paella stand covered for 5 to 10 minutes before serving.
When you serve your paella, you should have a browned bottom that looks like this. No, you have not burned your paella! This is called socarrat and this just means you have properly prepared your dish. You actually want the rice and all the yummy juices to do this!

The important things you get to bring home with you from vacations are your memories, your photos, and perhaps some souvenirs. I always enjoy coming home and trying to recreate some of the fabulous dishes I had while I was traveling!
Buen apetito!
This past week was incredibly hectic. I do not know how the days managed to get away from me, but they did! It was a very nice week, however, in that I received my first blogging award, The Sunshine Award. I also have “met” many wonderful food blogger friends on the new Food Blog Forum. It is such a great site with tons of incredible info. I just need to find the time to get into some of the forums and see what people are saying.
I also had my first giveaway which was fun. The recipe I created was featured on Tasty Kitchen on Thursday (that was 2 features on Tasty Kitchen in a week – yeah!) and it now will be on Country Bob’s website next week. To top things off, I received an email from Foodista last night telling me that my Meyer Lemon Sorbet is a finalist in their cookbook contest! You can still vote (if you would like to), by clicking on this link.
Since I was insanely busy all week with oodles of things to do, my hubby was incredibly sweet and stepped into the kitchen to make a mess cook dinner for me several evenings. I had doctor’s appointments, photography class, other commitments, blah, blah, blah and was just too exhausted to get cooking.
Thursday evening we picked up a little (2 lb.) sirloin tip roast and my hubby decided he would cook it up for us, since Bunky that usually cooks was totally wiped out! I must admit that he is an excellent cook (one of the reasons we would be together! 😉 ) and I thoroughly enjoy the evenings he takes over and tears up the kitchen makes dinner for us.
Here is very simple recipe for his version of roast boeuf!
Sirloin Tip Roast
Serves 4
1 Sirloin Tip Roast (2 lb.)
Olive Oil
Kosher Salt
Freshly ground black pepper
4 whole garlic cloves
2 Tablespoons unsalted butter, partially melted
4-6 springs fresh thyme
1 Tablespoon unsalted butter (room temperature)
Preheat oven to 450 degrees.
Bring roast to room temperature. Pierce the meat all over with a large fork to tenderize the roast. Slice any silver skin or side muscle on the roast. Cut 4 slits in roast and plug with garlic cloves. Rub roast all over with olive oil. Sprinkle generously with salt and pepper. Pour partially melted butter over top of roast. Place thyme sprigs on top. Place the remaining tablespoon of butter on top of the thyme.
Cook at 450 degrees for 15 minutes. Then, cover roast with aluminum foil. Reduce temperature to 350 degrees and cook for an additional 20-30 minutes (checking temp at 20 minutes). We like ours at 135 degrees (medium rare), so ours was done at this point. If you prefer your roast to be medium (150 degrees), you will need to cook it longer. It will depend on your oven, but probably it will take an additional 10-15 minutes.
If you are not pressed for time (like we were), you could also marinate the roast with a little red wine before cooking it to tenderize it further.
My hubby took a few pics of the dinner with a point and shoot. No fussy photography, but it was soooo good, we wanted to show you (even if the pics aren’t awesome)!
Now to the real meat of the post (ha ha) and what many of you may have come here for…the winners of the Country Bob’s All Purpose Sauce giveaway were:
#10 Rustic Garden Bistro
#20 Arlene Feix
There were a total of 24 eligible comments. Thank you everyone for participating! Check back soon because I will have another really awesome giveaway with a BIG ANNOUNCEMENT (big to me anyway!). 🙂
Have a great weekend!
Filed under Beef, Country Bob's, Entrees, Recipes, Roasting

This post is a bit late in making it for St. Patty’s Day, but after all, this is dessert, so it should be getting to you at about the right hour (if you are on the West Coast). I had a little post I had to do earlier in the day for the Sunshine Award (thanks again, Denise), so I am behind in all things (as usual).
I have to admit something…after making this ice cream, I am not sure I will ever want to eat another bite of ice cream out of a supermarket pre-packaged container again. I do not care who makes it or how much it costs…there is just no comparison to homemade ice cream! Besides, they don’t have the big boozy flavor that this one has! 😉 How can you go wrong with Bailey’s Irish Cream and dark chocolate??? Besides, with a little green whipped cream, this one is soooo perfect to end your dinner of green beer (oh, yuck!) and Irish Stew for St. Patty’s Day!
As with most recipes for homemade ice cream, this one is simple. I always like to make the base for ice creams or sorbet a day ahead so it is well chilled. Other than that, piece of cake (no – ice cream!).
Anyway, I was going to just make the Bailey’s ice cream just straight up (ha ha), however, there was this bar of dark Valrhona chocolate just dying to get mixed up in that bucket of ice cream, so naturally, I had to comply!
Bailey’s Ice Cream with Chocolate Shavings
Makes about 3 cups
1 1/2 cups Bailey’s liqueur
1/2 cup sugar
3 lg. egg yolks, at room temperature
1 cup whole milk (why skimp now??)
1 cup heavy cream
1 tsp. vanilla (the really good stuff)
1/2 cup dark chocolate shavings (something semi-sweet) from a block of dark chocolate (I shaved the chocolate with a veggie peeler.)
Bring the Bailey’s to a simmer in a small, heavy saucepan and continue to simmer over medium heat. Cook until the liqueur is reduced to about 1/2 cup. Mine took about 15 minutes. The liqueur will be thicker and slightly syrupy. Set aside.
In a medium bowl, beat the sugar into the egg yolks until thickened and pale yellow.
Bring the milk to a simmer in a heavy medium saucepan. Slowly beat the hot milk into the eggs and the sugar. Pour the entire mixture back into the pan and place over low heat. Stir constantly with a whisk or a wooden spoon until the custard thickens slightly. (Be careful not to let it boil or you will have scrambled eggs on your hands (and not custard). I usually check to see if the mixture slightly coats the back of a spoon. If it does, you are done!).
Remove from the heat and pour the hot custard through a strainer into a large, clean bowl. Add the heavy cream, vanilla and reduced Bailey’ Irish Cream. Cover and refrigerate overnight.
Stir the chilled mixture and then place in your ice cream freezer and freeze (according to your own machine’s directions). When the ice cream is semi-frozen, toss in the chocolate shavings and freeze until firm.
This stuff will not become totally frozen due to the amount of Bailey’s, so I put it in the freezer overnight to help firm it up a bit.
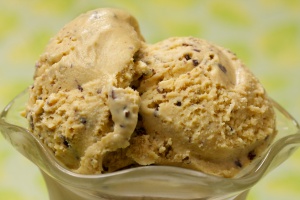
Wow…it it so rich and creamy and chocolaty! And if that wasn’t enough…I topped it with a little sweetened whipped cream with just a hint of green. Even though there is something scary about eating/drinking things that are not meant to be green…I just had to do it! 😉 You will not, however, be seeing that picture….
Hope you had a Happy St. Patty’s Day!
Filed under Bailey's Irish Cream, Chocolate, Desserts, Holidays, Ice Cream, Irish, Recipes, St. Patrick's Day